Google Analytics can be used to track just about anything on your website. In this guide, you’ll learn how to use it to track 404 errors on your website, as well as which pages are sending users to these broken links.
There are 2 ways you can track 404 errors in Google Analytics and see which page referred that traffic:
1. With Google Analytics only
2. With Google Tag Manager, by sending events in Google Analytics
Using the standard reports in Google Analytics
This method can report errors from whenever Google Analytics was installed on your website. You don’t really need to use events to track 404 errors in Google Analytics (Universal Analytics). The default reports, with the right filters, already contain this information.
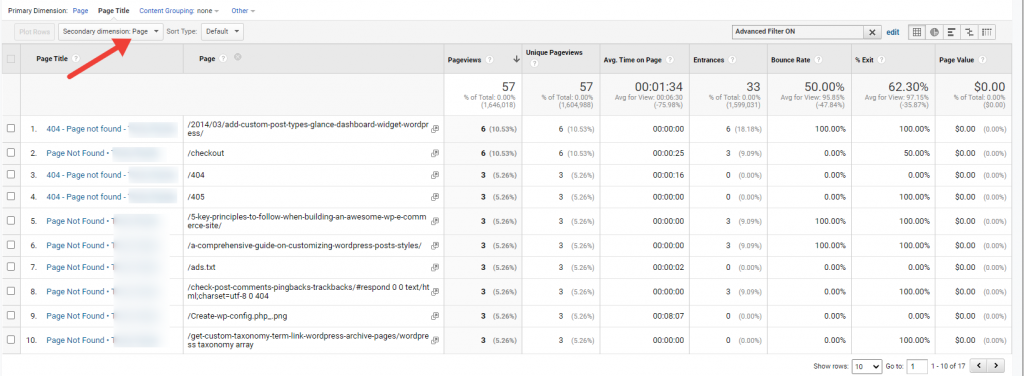
To find which broken links are getting traffic on your website and where that traffic is coming from, navigate to Behavior > Site Content > All pages. Next, switch the Primary Dimension to Page title

Now, you will have a list of all the titles of your pages. Next, we want to filter only pages which returned a 404 error. Typically, their title is page not found, so that’s what we’ll type in the search box of our report.
If your website returns a different title for 404 pages, please use that one instead.

In my case, there are 2 entries in the report, as I’ve switched the SEO plugins and the default titles changed too. Now, we can add secondary dimensions to get more useful insights. There are 2 secondary dimensions which are of interest to us:
1. Page
This allows us to see the exact URL of each page which returned a 404 error. If needed, we can redirect these URLs to other existing pages of our website.

2. Full referrer
This report allows us to see where did traffic come from when landing on a broken link which returned a 404 page.

Using events through Google Tag Manager
This method, while it has it benefits as it gives better control, has a major drawback compared to the previous method: it will only start collecting data from the moment this error tracking has been implemented.